Welcome to SuperSync Email for Outlook! We’re happy to help you keep your Outlook inbox and NetSuite records in sync with one another. Below is a quick guide to help you get started and take advantage of all the features our product has to offer. Happy logging!
Add-in Installation
Prerequisites: Make sure that your SuperSync Email for Outlook administrator has granted you access in NetSuite. Additionally, depending on your organization, you may not have permission to install an Outlook add-in. If you aren’t able to follow these steps, try reaching out to your internal IT team to assist you with setup.
1. Navigate to the ribbon in Outlook and click on the Get Add-ins option.
2. Click on the ‘My Add-ins’ then ‘Add a Custom Add-in” and select the 'Add from URL’ option.
3. Input the following URL, then click OK: https://outlook.supersync.cloud/assets/manifest/NetSuiteEmailConnector.supersync-prod.xml
4. To launch the add-in, select a message in your inbox and click on the SuperSync Email for Outlook icon in the ribbon and optionally pin the add-in to maintain its presence as you continue using Outlook.
Login Token
Following installation, you will be prompted to provide a login token in order to access your organization’s NetSuite records. This will be provided to you by your SuperSync Email for Outlook administrator.
Searching for Records & Logging Emails
Searching for Records
Search Options
Auto Search
By default, your add-in will be enabled with Auto Search. When a message is selected, the add-in will begin to search for related NetSuite records by entering the name and email address of the author of the selected email in the search box.
Manual Search
If you’d like to search for a specific NetSuite record, remove the search criteria in the search box and enter your own search terms.
Pro-tip: to search within specific record types, use NetSuite's Global Search Prefixes to obtain more specific results (jump to page 7 in the link for more information)
Configuring Search Settings
To set the default search behavior, click on the Settings button at the bottom of the add-in.
Select from either the Automatic or Manual options.
To save your preferences, minimize the settings bar.
Logging Emails
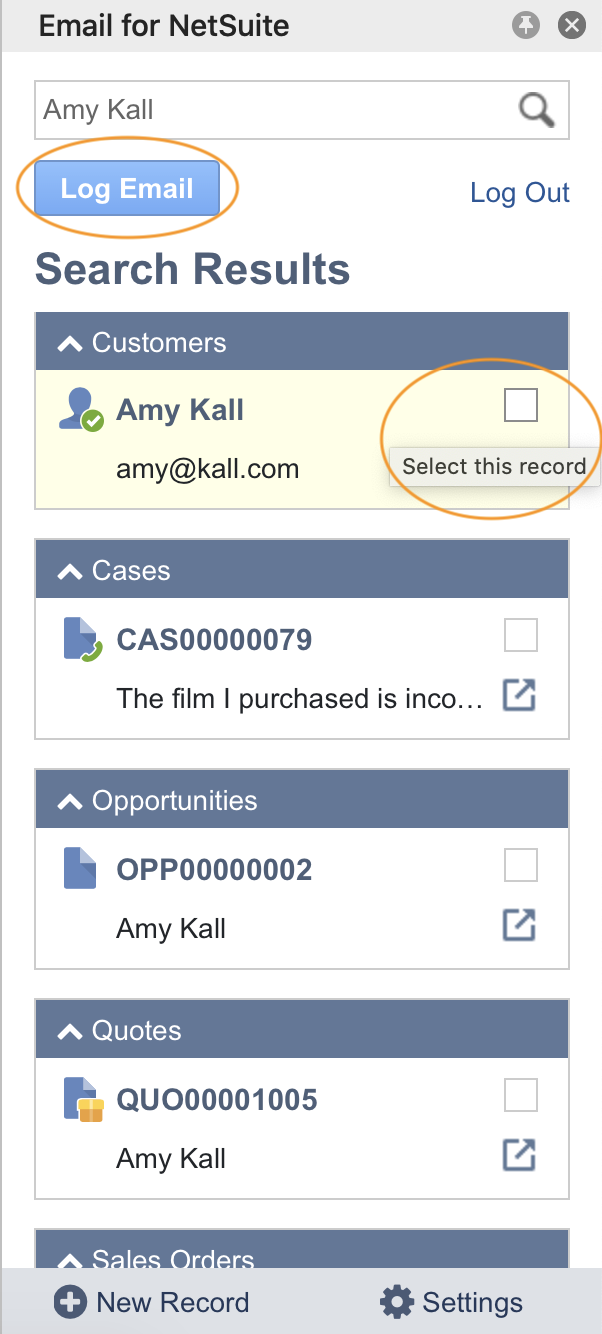
How to Log an Email to a NetSuite Record
1. Once the desired record has populated in the search results, select the record(s) that you wish to log the selected email to.
2. Click on the Log Email button.
3. Following a successful log attempt, the logged record will appear with a green checkmark to confirm the successful attempt.
4. Additionally, the email will be labeled in your inbox with a ‘Logged to NetSuite’ Outlook category.
Auto Log
The Auto Log feature allows users to log a single email message and then automatically logs additional message on that thread to the same NetSuite record when the user selects those emails.
Example use case 1:You’re involved in an important email conversation, with pertinent information being shared back and forth. You want to ensure all of that information is captured on the associated NetSuite record. Log the initial email to the NetSuite record, then enable the Auto Log toggle. Then, every email selected within that conversation will also be logged to the specified NetSuite record.
Example use case 2:Your leadership team prefers to see a complete record of communication on NetSuite records. Log an email and then enable the Auto Log toggle to ensure no message is ever missed.
How to Enable Auto Log
1. Following a successful log attempt, the record will display an additional option to ‘Auto Log this Conversation'. Once enabled, anytime another message is selected within in the same conversation, that message will also be logged to the NetSuite record.
Note: as a prerequisite for the above functionality, the add-in must be open when the messages are selected in order for them to log to NetSuite
2. If at any time the conversation is no longer relevant to continue auto-logging, simply toggle the option back to the off position
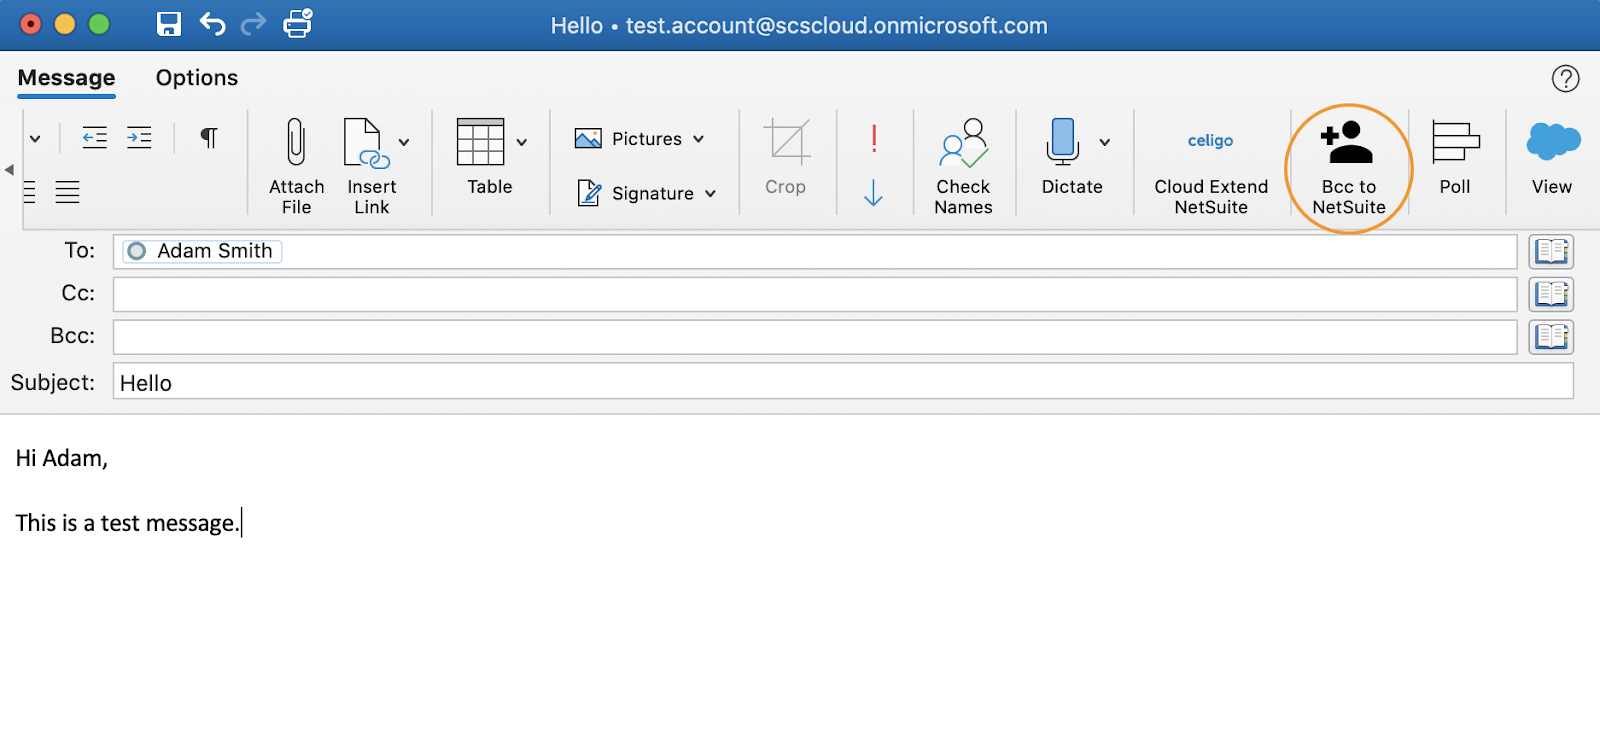
Bcc to NetSuite
Bcc to NetSuite enables email logging while in Compose mode and works by logging the email to the recipient(s) in the ‘to’ field upon clicking the send button. The feature contains customizable logic, which your administrator will configure. Depending on your organization’s configuration, you should confirm expectations of the functionality of this feature with your administrator.
In the event that a matching record is not found, the email will appear in the Unmatched Emails Suitelet. Contact your administrator for more information regarding the Unmatched Emails Suitelet.
Example use case: You are writing an email that you also want to log to NetSuite. Rather then sending the email and then using the add-in to log it, you’d rather log the email by bcc’ing it to NetSuite because you know that the first email listed in the ‘To’ field is on the Contact record you’d like the email to log to.
How to Bcc an Outbound Email to NetSuite
Compose an email either by creating a new email or replying to an email
Navigate to the ribbon and click on the Bcc to NetSuite icon
An email address will be inserted into the bcc field
Send the message
Create NetSuite Records
This feature allows you to create certain NetSuite records from directly within your SuperSync Email for Outlook add-in. Note that this feature is only available on a profile-by-profile basis, so your Administrator will need to enable each record type for the profile assigned to you in order for you to be able to create that particular record type.
Example use case 1: You receive an email that you want to log to NetSuite, but when you search for records related to that name or email, you don’t get the results you were anticipating. With Record Create available, you can create a new NetSuite record without ever navigating away from your email.
How to Create a New NetSuite Record
Click on the New Record button at the bottom of the add-in
Select the NetSuite record type you wish to create
Complete all required/desired fields
Save the record
From there, you will have the option to log the selected email to the new record.